Builder‑grade homes are great for their bones, but let's be honest: the finishes are… fine. Flat white walls, basic light fixtures, hollow closet doors, and hardware that says “minimum viable product.”
But you don't need a renovation budget to make a room feel yours. We asked the Nest & Budget community: What’s the one upgrade under $300 that made the biggest difference in your builder‑grade home?
Here are their top answers — ranked from “why didn’t I do this sooner?” to “I can’t believe it was that cheap.”

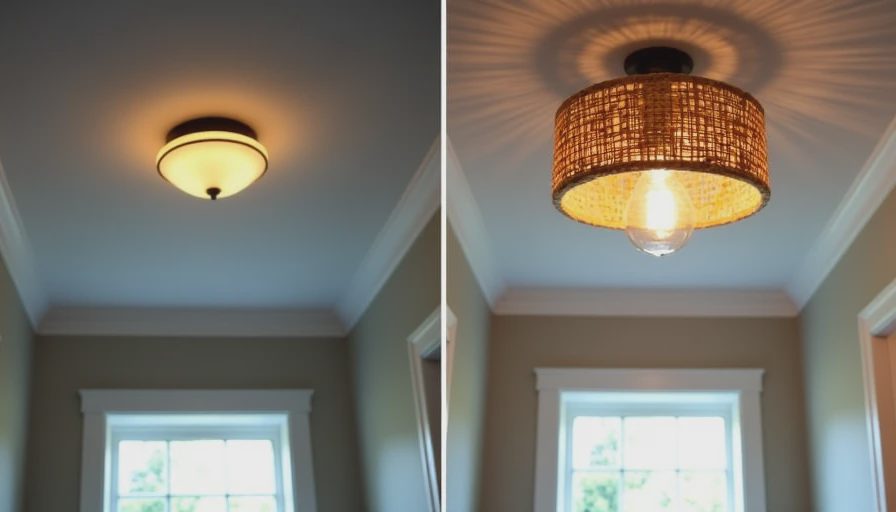
1. Swap out the boob light for a semi‑flush mount fixture
Cost: $80–200
Time: 30 minutes (DIY, even for beginners)
That dreaded flush‑mount ceiling light with the frosted glass nipple? It's in every builder‑grade home. Replacing it with a semi‑flush mount fixture (fabric drum, woven rattan, or a simple geometric metal shade) instantly elevates the whole room.
“I put a $120 rattan semi‑flush in our hallway. Now I actually look up. It went from ‘rental’ to ‘casual coastal’ in one Saturday.” — Megan, mom of 2
Pro tip: Choose a fixture with a clear bulb or exposed Edison bulb for warmth. And add a dimmer switch (another $20) for instant mood control.
2. Replace hollow closet doors with sliding barn doors or bi‑fold louvered doors
Cost: $150–300 (if you shop salvage or big‑box store)
Hollow core sliding or bi‑fold doors scream “builder grade.” Swapping them for solid louvered doors (painted a fun color) or a sliding barn door (even a simple flat panel) changes the whole hallway.
“Our laundry closet had those cheap bi‑fold doors that never stayed on track. I found a solid pine sliding door at Habitat ReStore for $40, added a $20 track kit, and painted it charcoal. Now it looks like a feature, not an afterthought.” — David, first‑time buyer
Cost breakdown: Track kit (~$50), door ($40–150), paint ($10). Total well under $300.
3. Add a picture rail or chair rail + paint two tones
Cost: $150 (wood, paint, nails)
Builder‑grade rooms are often one uniform color floor to ceiling. Adding a simple picture rail (molding about 12–18 inches below the ceiling) or a chair rail (about 36 inches from the floor) lets you paint two colors: lighter above, darker below. It adds architectural interest for pennies.
“I put a picture rail in our nursery. Painted below it a soft sage, above it white. Now the room feels taller and actually custom. Took one afternoon and $80.” — Jess, DIY mom
Pro tip: Use the picture rail to hang art without nails — perfect for renters or those who change their mind often.
4. Upgrade outlet covers and light switch plates to screwless
Cost: $2–5 per plate (so ~$50–100 for a whole house)
Screwless wall plates (like Lutron Claro or Leviton) have a smooth, snap‑on cover that hides the screws. They look built‑in, not like a hardware store afterthought.
“This is the dumbest thing I love the most. The old plates had yellowed screws and visible screw slots. Screwless plates cost me $60 for the whole living area, and now the walls just look… finished. Clean. Like someone cared.” — Anonymous (but we all agree)
Bonus: They're easier to wipe clean when your toddler smears anything on them.
5. Install a smart thermostat (that looks good)
Cost: $150–250 (often with utility rebates bringing it under $100)
That basic white rectangle thermostat is an eyesore. A Nest, Ecobee, or even a basic Amazon Smart Thermostat (which looks surprisingly sleek) makes the hallway feel intentional. Plus, you save energy.
“Our builder left a 1990s Honeywell. I swapped it for a Nest for $200 after rebate. Now the hallway looks like a grown‑up lives here. And I can turn down the heat from bed.” — Chris, dad of 1
6. Swap cabinet hardware and add soft‑close hinges

Cost: Hardware ($50–150), hinges ($30–50 for a set)
Builder‑grade cabinets often come with cheap, small knobs or wire pulls. Swapping to matte black, brass, or leather pulls changes the whole kitchen or bathroom. Adding soft‑close hinges (retrofit kits exist) makes the cabinets feel luxury.
“I spent $120 on new pulls and $40 on soft‑close hinge add‑ons for our kitchen. Now when my toddler slams a cabinet, it just… whispers closed. Worth every penny.” — Sarah, mom of 2
Pro tip: Use a template drill guide ($10) to ensure perfectly aligned holes.
7. Add a peel‑and‑stick backsplash (just a small section)
Cost: $50–150 for a 10–15 sq. ft. area
A full tile backsplash can be expensive and messy. But a small section behind the stove or coffee bar with peel‑and‑stick tile (good quality, not the cheap vinyl stickers) adds a custom focal point.
“I did a 3x4 foot section of peel‑and‑stick zellige‑look tile behind our coffee station. Took two hours, cost $80. Every guest asks if it's real tile.” — Emily, renter/homeowner
Brands recommended: Smart Tiles, Art3D, or Tic Tac Tiles (they look like real glass or stone).
8. Replace basic interior door handles with lever handles
Cost: $15–30 each (so $150–200 for a few main doors)
Builder‑grade round knobs are dated and hard to open with full hands. Levers look more modern, are easier to use (and ADA‑friendly), and can match your other finishes.
“I changed all the bedroom doors to matte black levers. Cost $25 each. Now the hallway looks cohesive and intentional. Plus I can open a door while holding a baby and a cup of coffee.” — Alex, new dad
Pro tip: Buy a multi‑pack (4–6 levers) from Amazon or Home Depot to save.
9. Add a row of wall hooks with a shelf (mudroom style)
Cost: $100 (shelf + hooks + paint)
Builder‑grade entryways have no landing strip. A simple 4‑foot shelf (pine or poplar) with 4–5 hooks underneath gives you a place for bags, coats, and keys. Paint it a bold color or match the trim.
“Our entry was just a blank wall. I built a shelf with hooks for $60 (wood + hooks). Now we don't lose keys, and my toddler can hang her own backpack. Feels custom and functional.” — Mike, DIY dad
No tools? Buy a pre‑finished shelf and screw in hooks. Takes 20 minutes.
10. Change your bathroom mirror to a framed or arched one
Cost: $100–250 (or thrift a vintage mirror for less)
The standard builder‑grade bathroom mirror is a thin, frameless rectangle glued to the wall. Replacing it with a framed mirror (or adding a DIY frame around the existing one) makes the bathroom look finished.
“I found a 30” round arched mirror on Facebook Marketplace for $40. Spray painted the frame matte black. It made our powder room go from ‘rental’ to ‘boutique hotel.’” — Lauren, homeowner
DIY hack: Buy a plain builder mirror and add a mitered wood frame around it. Wood + glue + paint = $50.
The common thread
None of these upgrades require a contractor, a big budget, or even a weekend. They're small swaps that signal someone thought about this room.
What's your under‑$300 upgrade that made a builder‑grade room feel custom? Drop it in the comments — we're always looking for the next one.

No comments yet — be the first to share a thought.